DIY Rustic Dresser
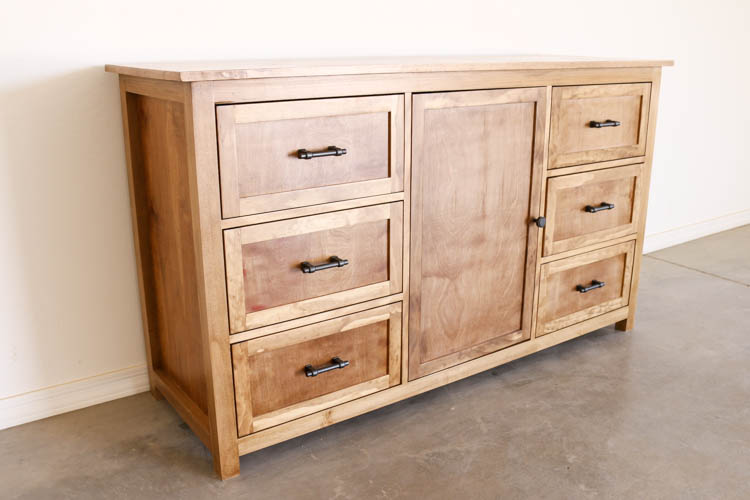
If you’ve been searching for the perfect DIY rustic dresser for a kid’s bedroom (or really any room), this is the build for you. This dresser is over five feet long, features six deep drawers plus a center cabinet with two adjustable shelves, and is finished in a rich walnut stain that looks anything but DIY.
I built this for my youngest son, who had long outgrown his old IKEA dresser. After months of indecision on design, I finally landed on a style that works beautifully with the rest of the room — and I’m so glad I waited, because the end result is absolutely stunning.
In this post, you’ll find:
- A full step-by-step written tutorial
- A free downloadable PDF cut list and materials list
- A complete YouTube video walkthrough
📥 Download the Free Printable Dresser Plans (PDF)
📺 Watch the Full Build Video on YouTube
Materials & Tools Overview
Before diving in, download the free PDF plans (linked above) for the complete materials list and cut list. Here’s a quick summary of the main materials used:
- 2×2 select pine (or poplar, ripped down on a table saw)
- 3/4″ plywood — side panels, top, and drawer boxes
- 1/2″ plywood — drawer box sides
- 1/4″ plywood — drawer bottoms and drawer front panels
- 1×2 select pine — face frame
- Wood glue, pocket screws (1″, 1 1/4″, 2 1/2″), and narrow crown staples
- Minwax Wood Conditioner + Minwax Special Walnut Stain
- Polycrylic topcoat
- Veneer edge banding
- Drawer slides
- Liberty soft iron cabinet pulls and knobs
Key Tools Used:
- Kreg Pocket Hole Jig
- Kreg Shelf Pin Jig
- Rockler Universal Drawer Slide Jig
- Router table + Rockler 15/64″ undersized straight bit
- Table saw
- Band-It veneer trimmer
- Finish Max paint sprayer
- 3/4″ Forstner bit
- Cabinet hardware jig
Step 1: Mill the Frame Lumber
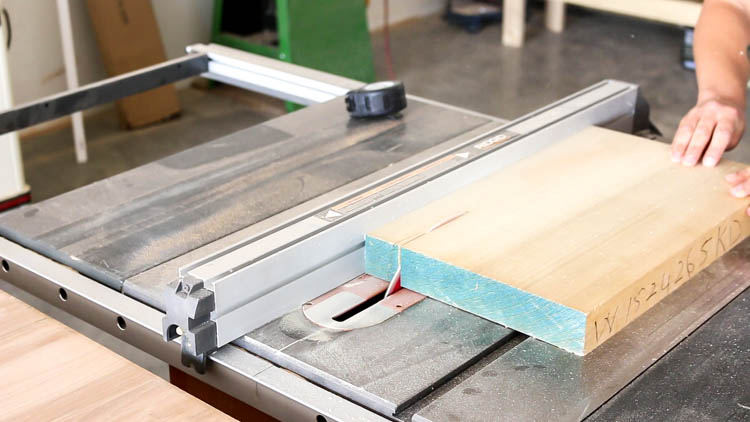
I originally designed these plans around 2×2 select pine, which is readily available at any home improvement store. For this build, though, I decided to experiment with poplar for the first time — and I loved it.
I purchased a large 8/4 board and ripped it down on my table saw into true 2×2 sticks. This gave me straighter, more consistent pieces than off-the-shelf dimensional lumber, and poplar takes stain beautifully.
Pro Tip: If you’re new to ripping lumber on a table saw, take your time and use a featherboard to keep consistent pressure against the fence.
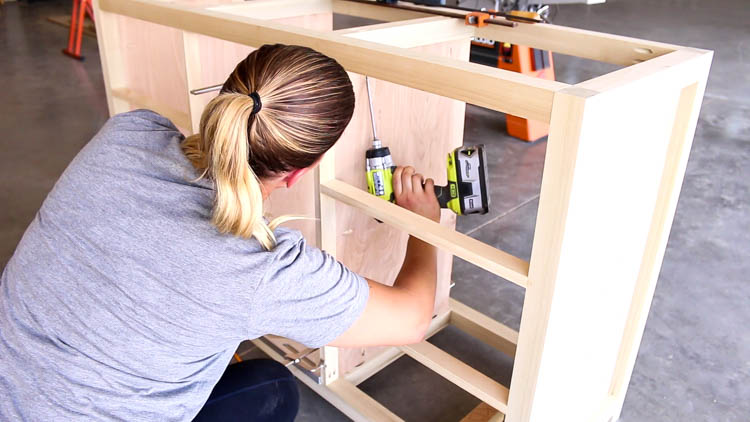
Step 2: Build the Dresser Frame

Once all the 2×2 frame pieces were cut to length, I drilled 1 1/2″ pocket holes and assembled the frame using wood glue and 2 1/2″ pocket screws.
For the side panels, I used 3/4″ plywood and attached them flush with the inside edge of the dresser legs using 1 1/4″ pocket screws and wood glue.
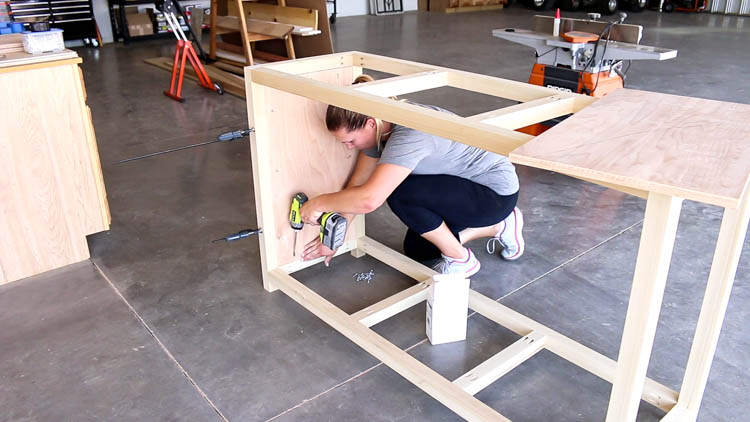
I also added 2×2 stretchers in the center section of the frame. These serve two purposes:
- Adding structural strength to the overall frame
- Providing attachment points for the walls of the center cabinet
Step 3: Build and Install the Face Frame
The face frame is built from 1×2 select pine. The vertical pieces are spaced 18 1/2″ apart.
To keep the horizontal frame pieces perfectly even, I cut scrap wood blocking at 9 1/4″ and used it as a spacer while attaching each piece with 1 1/4″ pocket screws. Once the face frame was installed, I attached the cabinet walls using the same pocket screws.
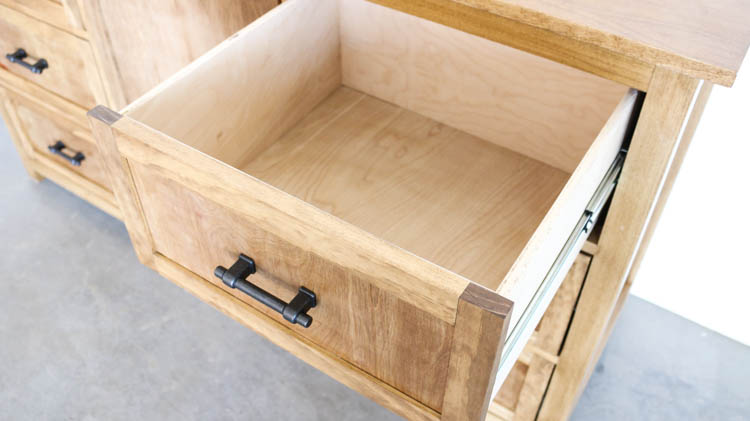
Step 4: Build the Drawer Boxes
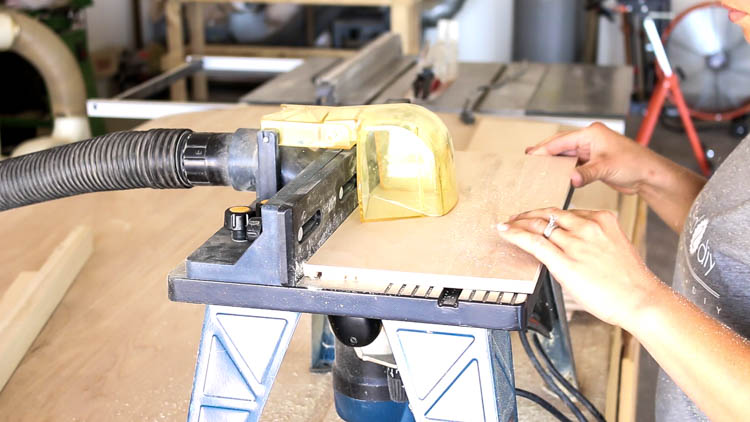
For the drawer boxes, I ripped 1/2″ plywood into 8″-wide strips and cut them to final size.
To accept the 1/4″ plywood drawer bottoms, I used my router to cut dado grooves into the drawer sides. One important thing to know: plywood is almost never exactly the thickness advertised. To get a snug dado fit, I used a Rockler 15/64″ undersized straight router bit — this makes a huge difference in joint quality.
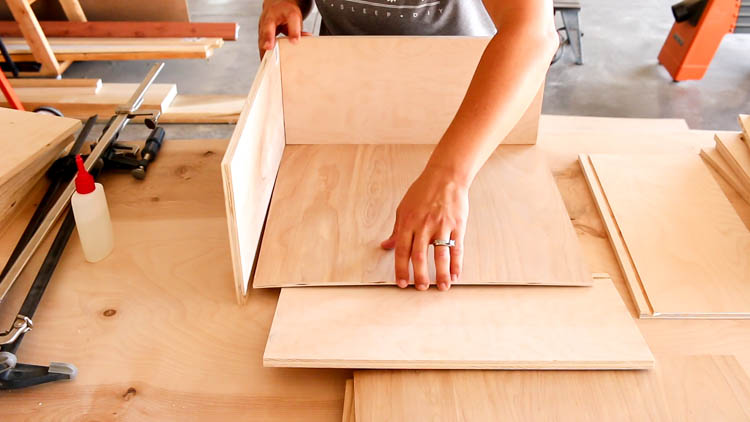
I also drilled 1/2″ pocket holes into the 16 1/2″ drawer front and back pieces. Once the dados were cut, I assembled the drawer boxes with glue in the dado grooves and along the ends, clamped them square, and finished with 1″ pocket screws.
Step 5: Build the Drawer Fronts
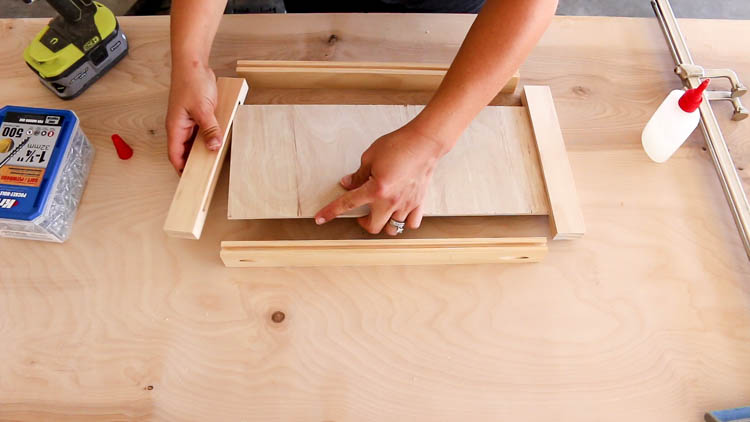
The drawer fronts are frame-and-panel style, also using a 1/4″ plywood center panel set into routed dados.
For the longer horizontal frame pieces (15 1/4″), I ran them completely through the router table to cut the dado. For the shorter vertical pieces (6 1/2″), I used a plunge-and-lift technique at the router table to create a stopped dado that doesn’t run all the way to the ends of the board — keeping the frame face clean and professional-looking.
📺 See exactly how to do this in the YouTube video — it’s much easier to see than to describe!
Step 6: Drill Shelf Pin Holes
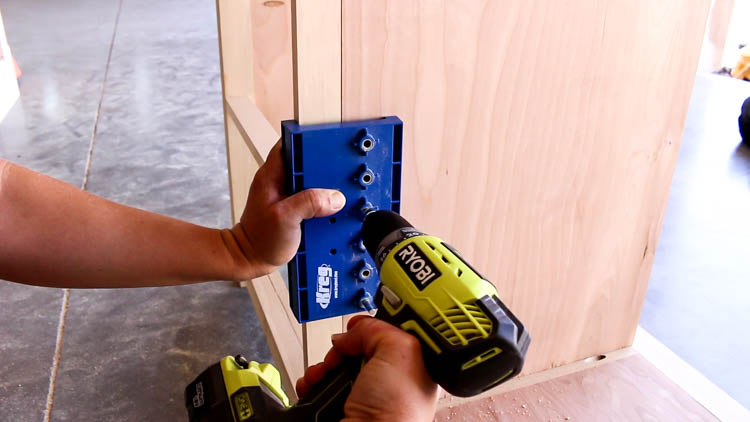
I used my Kreg Shelf Pin Jig to drill the shelf pin holes inside the center cabinet. This jig ensures perfectly aligned, evenly spaced holes every time — no measuring required.
Step 7: Build and Finish the Top
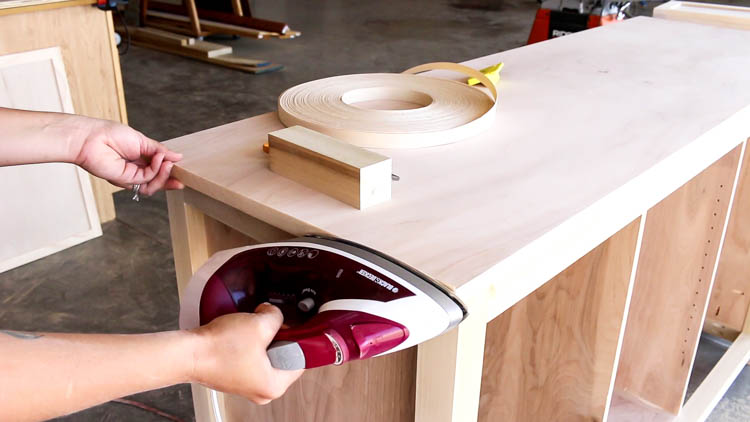
The dresser top is cut from 3/4″ plywood. To give the exposed edges a finished, solid-wood look, I applied iron-on veneer edge banding. Once the glue cooled, I trimmed the excess with a Band-It veneer trimmer for clean, flush edges.
Step 8: Sand and Apply Finish
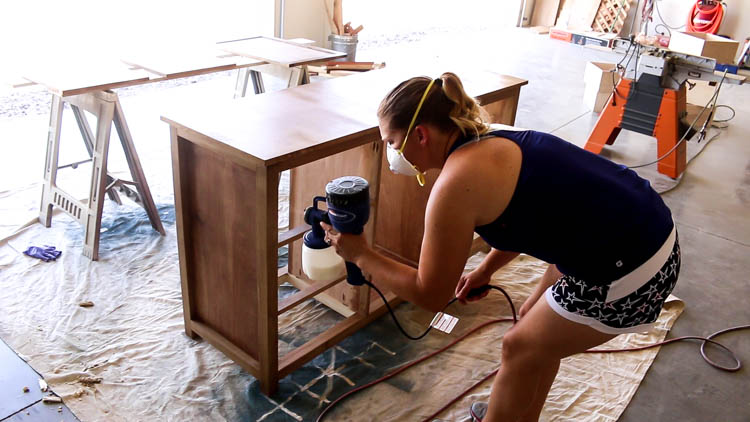
I sanded the entire dresser with 220-grit sandpaper, then applied the finish in this order:
- Minwax Wood Conditioner — ensures even stain absorption, especially important with poplar
- Minwax Special Walnut Stain — two coats for a rich, deep tone
- Polycrylic topcoat — three coats, applied with a Finish Max sprayer for a smooth, drip-free finish
The walnut stain on poplar turned out even better than I expected — warm, rich, and with beautiful grain character.
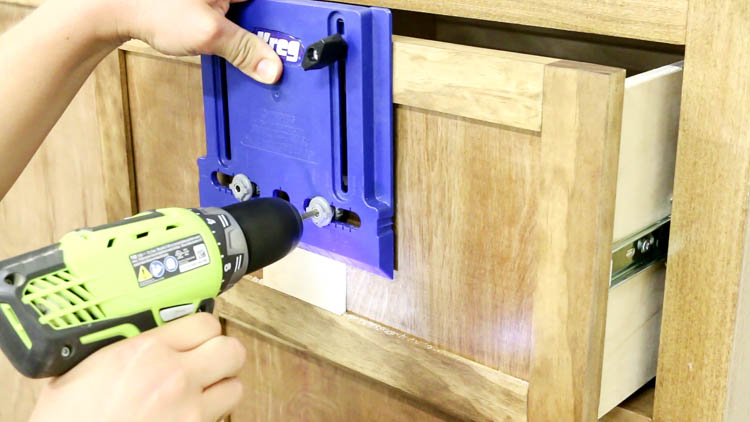
Step 9: Install Drawer Slides
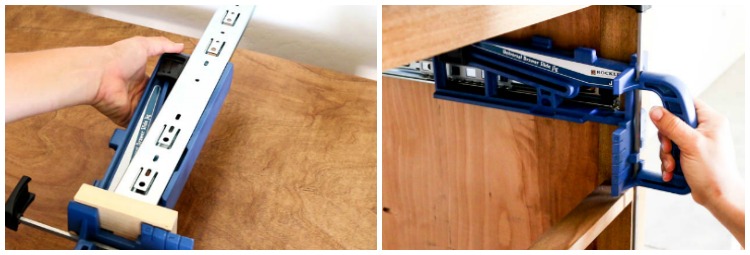
I used the Rockler Universal Drawer Slide Jig for drawer slide installation — this tool is a serious time-saver.
Because these are inset drawers, the drawer slides needed to be positioned 3/4″ in from the face of the dresser. I used a scrap piece of wood as a spacer, set the drawer slide against it, then tightened the jig into position. This ensured every slide was installed at exactly the right depth, consistently, every time.
Step 10: Attach Drawer Fronts
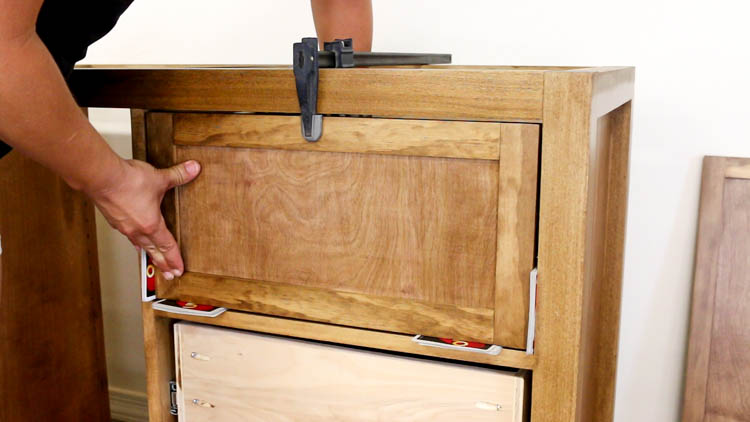
With all drawer boxes installed, it was time to attach the fronts.
I used even stacks of playing cards around the perimeter of each drawer opening to create a perfectly uniform gap, then clamped each front in place. From inside the drawer box, I drove 1″ screws through the corners into the drawer front to secure it.
This technique gives you clean, consistent gaps without any measuring — just make sure the card stacks are all the same height!
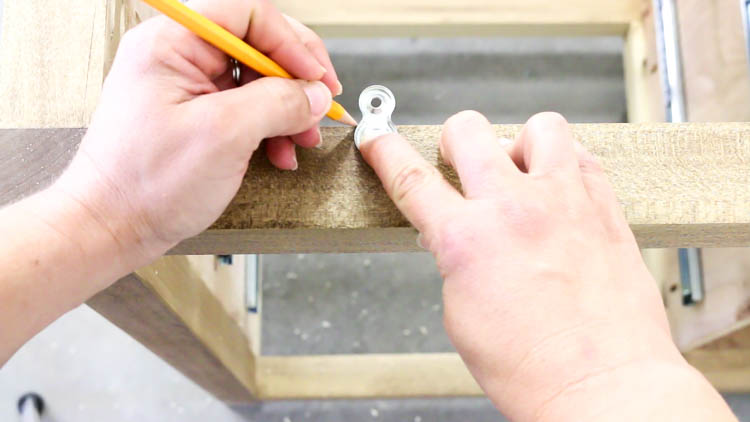
Step 11: Install Cabinet Hardware
I used a cabinet hardware jig to drill consistent, perfectly centered holes for all the pulls and knobs. For hardware, I chose Liberty soft iron cabinet pulls and knobs — the finish pairs perfectly with the walnut stain and adds a great rustic-industrial touch.
Step 12: Attach the Top and Add Backing
To attach the top without visible fasteners, I used desktop fasteners. I traced around each fastener, then used a 3/4″ Forstner bit to drill a 1/8″-deep recess so each fastener sits flush with the top of the dresser frame. The fasteners were secured with 1 1/4″ wood screws, and the top was centered and attached with 5/8″ wood screws.
Finally, I cut hardboard backing panels to size and secured them with 1″ narrow crown staples — this gives the dresser a clean finished look from behind and adds rigidity to the whole piece.
The Finished DIY Rustic Dresser
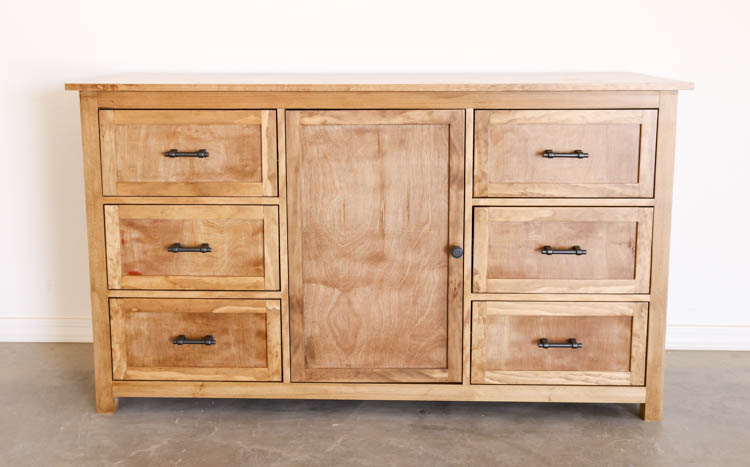
I could not be happier with how this build turned out. My son absolutely loves it — and honestly, I’m thrilled to finally retire that sad IKEA dresser he’s had since he was a toddler.
The dresser stretches just over 5 feet wide and provides an incredible amount of storage:
- Six deep drawers for everyday clothes
- Two adjustable shelves in the center cabinet for folded items, uniforms, or whatever else needs a home
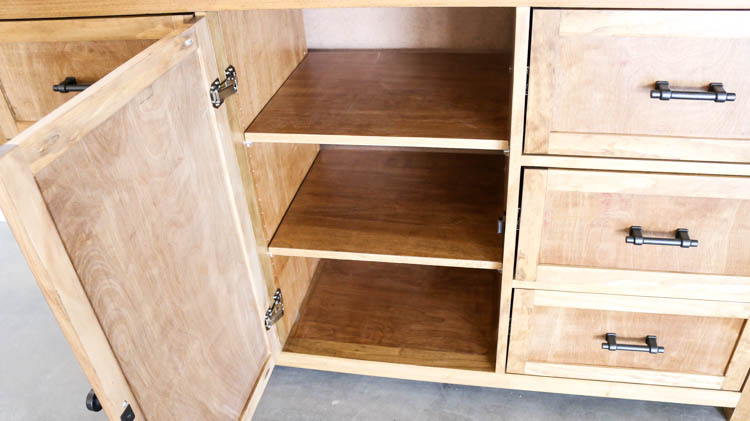
In fact, when he was sorting out where everything would go, we ended up with a couple of empty drawers — that’s how much storage this thing has!
Free Plans + Video Tutorial
Don’t forget to grab the free plans and check out the full build video:
📥 Download the Free Printable Dresser Plans (PDF)
📺 Watch the Full Build Video on YouTube
I’d love to see your version of this dresser! Tag me on social media or send photos to [your email] — you could be featured on the blog!
DISCLOSURE: I was provided products and/or compensation for this post. All opinions and ideas are 100% my own.