Hey there everyone! Happy Wednesday. It’s especially happy for me since today is also my birthday:) Remember yesterday when I shared this fun Magnetic Build a Jack-O-Lantern Activity for Kids? I promised I would share a tutorial on how I used the Silhouette PixScan cutting mat and today I’m delivering on that promise! Last month, Silhouette America released this awesome new tool to use with the Silhouette Cameo and Portrait. When Silhouette was kind enough to send me a machine to review, I immediately went shopping for a few other tools and materials and bought the PixScan mat. After being so limited with my old cutting machine, I was beyond excited for the opportunity to finally be able to use a machine that wouldn’t limit my creativity. My Cameo has lived up to my expectations and beyond, and I haven’t even scraped the surface of what it’s capable of!
On to the tutorial! This post may get a little lengthy with pictures, but I promise that the PixScan cutting mat and feature are actually extremely easy to use! I’ll start by saying that it comes in two sizes. One is compatible with the Silhouette Portrait machine and one with the Cameo. The cutting area is 8 1/2 x 11, which allows you to use a standard printer to print out images and then cut around them.
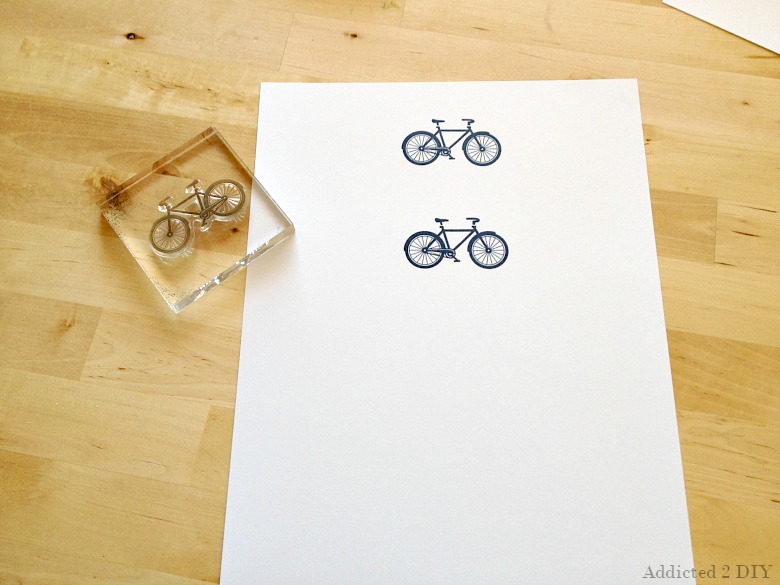
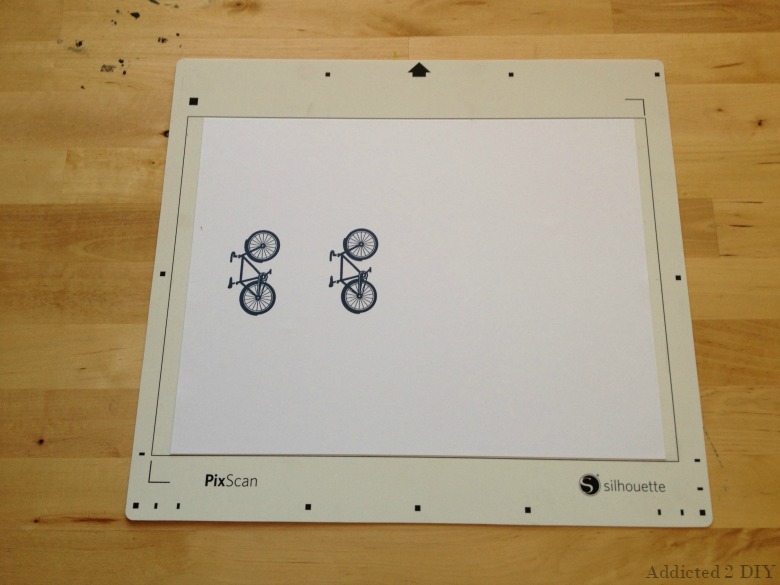
For this tutorial, I decided to use a stamped image. I chose one that had some detail to it so you could truly see the capabilities of this feature. I stamped two images to also show the different types of cuts you can do using the PixScan.
I placed my cardstock in the cut area on my PixScan mat. This image is straight out of my iPhone. The picture isn’t the greatest, but I purposely wanted to show that it doesn’t have to be an amazing picture in order for this to work. The picture is also taken at an angle. They can be taken at an angle or straight above and the images will upload to the Silhouette Studio. You can also scan your images using your scanner as long as it is able to capture the entire mat.
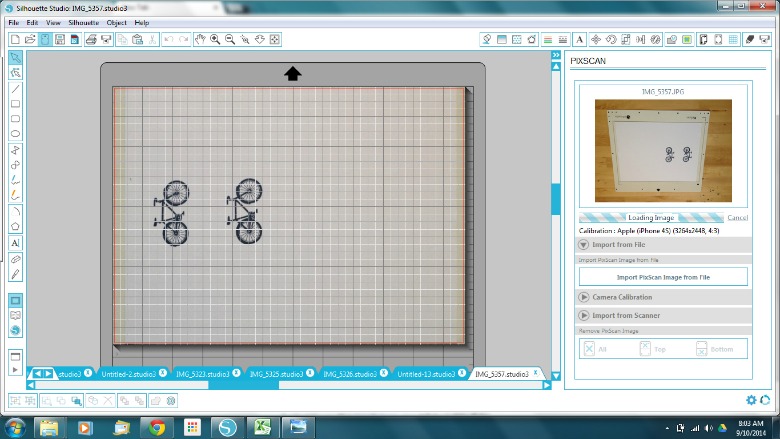
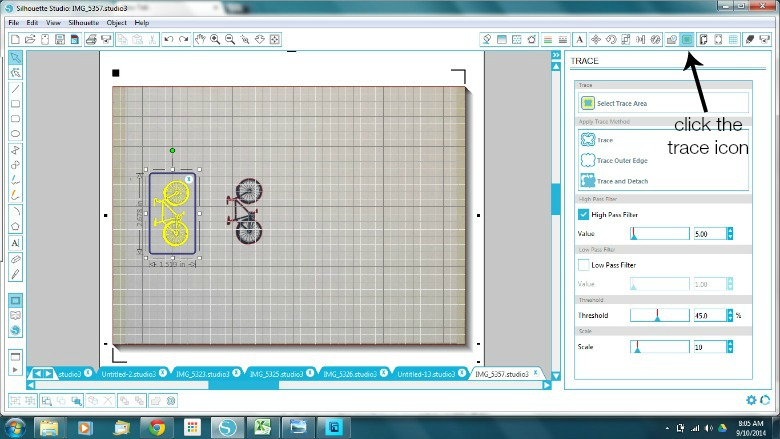
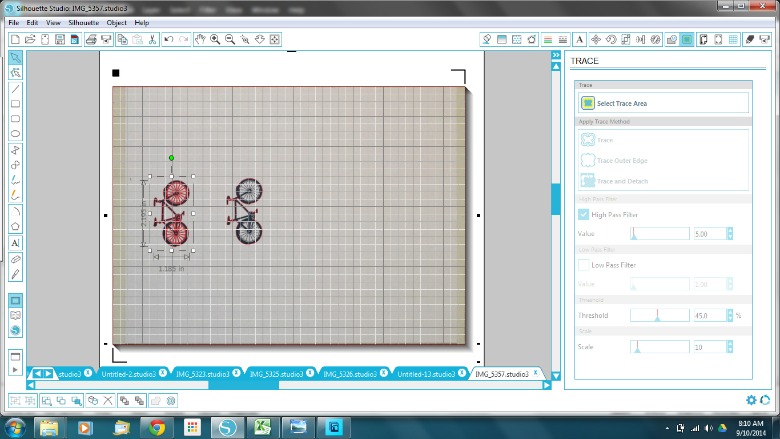
Once the box has highlighted your image, you’ll chose how you want it to be traced. For the image on the left, I selected the “trace” button. For the image on the right, I selected the “trace outer edge” button. The trace button will trace a line inside every nook and cranny. The trace outer edge does just what the button says. It traces the outside of the image.
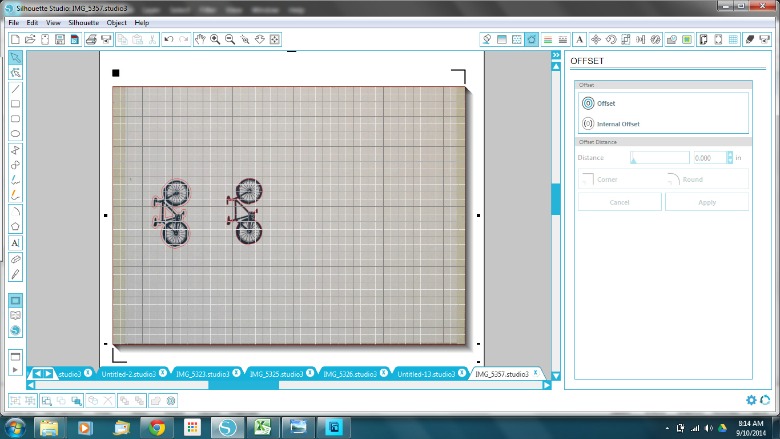
For the image on the right, I chose to cut the image precisely on the border. For the image on the left, I wanted my cut to be offset from the border. I highlighted the image and clicked the offset icon, which is the on the bottom toolbar to the far right (little circles). It immediately creates an offset border. You can change the distance that you want the line to be offset on the right hand sidebar. There will still be a trace around the exact image, so what you’ll need to do is right click on the image. Choose “group”, then right click on the image again and choose “weld”. This will create your offset cut line.
I then set my cut settings to the cardstock setting and sent it to my Cameo to cut.
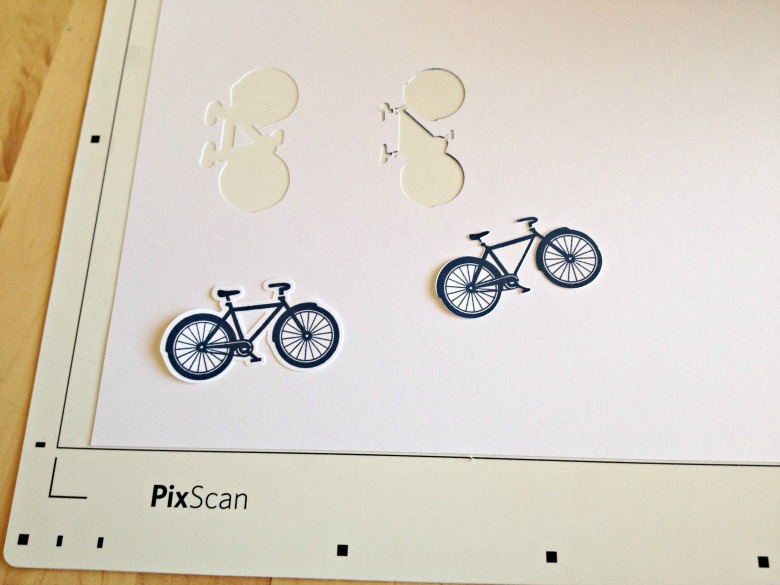
You can see that I was left with two perfectly cut images, just how I wanted them! This feature opens up so many possibilities for me! I have so many stamps that I would never use because I didn’t have a punch to use with them, or I didn’t want to spend tons of time cutting around the stamped images. The PixScan feature gives me a perfect cut, exactly where I want it! Like I said, this tutorial may feel a bit long, but when you actually go and set up your cut, it only takes minutes. I am beyond excited that I learned how to use this new feature and I hope that you found my tutorial helpful. If there are any steps that you are uncertain of or have any questions at all, I’ll do my best to answer them! I’d love to hear if you tried it out and what you think! If you’d like to purchase your own Silhouette PixScan Mat, you can purchase them online at Silhouette America {affiliate link}.

Thanks for this article! I think you have open a door for me & my silhouette machine. LOL!
So glad I could help!
So excited to try this! I’m going to take my Cameo out of the box now after almost a year! This alone is worth it!
Yes, this feature alone is a game changer. There’s so much more that I’m still learning and I’ll be sure to fill you in:)
Oh, wow! I already have so much to learn with my Silhouette, but this feature is something I must try soon. So many possibilities! Thank you so much for sharing a tutorial! 🙂
Julie at Being Home recently posted…Building a Garden Bench – Partial Tutorial
Hello,
I did all as you said in tutorial, but my design is being cut out with all the details, but the outside border only some of it is being cut out and traced. I have selected the settings as you described for my very intricate card I am making. I uploaded a picture which shows all the details, but can’t get all my tracing to appear. What can I do to fix this?
Liz recently posted…Pottery Barn-Inspired Skull Art
Liz, can you email me with a picture so I can see what you mean? Katie@addicted2diy.com
This was so, so helpful! I just received a Portrait for my birthday, and I was looking for a really easy way to utilize it with all my stamps. Fussy cutting is so time consuming and aggravates the tendon in my thumb. This is a perfect fit to what I want to do with my Portrait! Just Pinned this, so I can refer back to it when my Pix Scan mat! Thanks so much!
Debbie, aka Indy
Indy recently posted…Cupcakes Inspirations #283-Paper Pretties
I’m so glad it helps you out! It is definitely so much nicer than cutting around stamps by hand!
I’m so glad you found it helpful!
Thanks so much for your tutorial. My Pixscan Mat is sitting here waiting for me and I would have spent hours figuring this out on my own!
my cameo always say registration failed
my problem was also this. Then I realized that I was taking my image and putting it on my cameo cutting mat and not leaving it on my pixscan mat! Voila! Prolem solved (for me at least 🙂 )
I’m glad you figured it out! I never even considered that might be the case.
Great tutorial! I got Silhouette Cameo for my Christmas gift from my son last Thursday. So, I’m wondering if the PixScan mat can be reused or just once to be used and then order other new one? I’m just very new to Silhouette Cameo 🙂
Joyce @ Live Laugh Love Post recently posted…Top 3 Great Christmas Movies
It can be used over and over, just like a regular mat
Thank you so much for a wonderful tutorial!
I do have a questions though–how would you set up your machine to cut the image as a stencil? So with your bike example, what would the cut settings be to cut out the inside parts too? I have some things I’d like to pixscan and then use as a t-shirt stencil!
Thanks!
I am having the same problem as jac in comment #12. I have followed your directions over and over. I have retaken the photo several times as well, but I keep getting the message “registration failed”. Can you tell me what I am doing wrong?
That is so strange. I haven’t ever had that happen to me. Do you have the most current update of the Silhouette Studio?
Yes. I updated it a couple of weeks ago.
I don’t know what the problem would be. When you say “registration failed,” is it that it won’t find and trace the image, or is it not finding the registration marks on the cutting mat?
I don’t know. It does not give me any other information or indication of what might be wrong. All it says is “registration failed”. Is there some way to check and see if the registration marks on the mat are recognized?
If you try cutting, it should read the registration marks around all corners of the mat first, then it will cut. If your machine isn’t finding them at all, then it should tell you. To test it, why don’t you open a blank PixScan mat in your page settings, then place one of your cut files from your image library on it and try cutting it out. That will help to rule out whether or not your machine is just not reading the registration marks. If it doesn’t read them, it could be either a problem with your mat or your machine.
Thanks so much for this tutorial. My very first cut on my Cameo is using PixScan and the “following instructions on screen” advice on the mat got me nowhere (there are none!)
Yeah, it was pretty confusing and I noticed there really wasn’t a tutorial out there for it, so I tried to make it as easy to follow as possible:)
thank you for your hard work on this project. I am hoping you might do some instructions on making a Silhouette. I would like to silhouette my grandsons faces. New to the cameo silhouette. I am not familiar with a Pix scan. I am assuming it is an extra purchase.
Pam
The pix scan mat is something extra you have to purchase, but they aren’t too expensive and you can find them on Amazon. I can always work on a silhouette tutorial for you:)
I would really appreciate Your effort to teach me and the others that read your instructions. They are easy to follow. I feel I willl learn a lot from you
Thank you
Do you know if it is possible to cut out something within an image – rather than cutting out outlines? I’ve got some cards I want to cut sections out of. . .but the cards themselves are already “cut out”. Like, if I wanted to cut out the picture of the Ace on the Ace of Spades? (I’m actually wanting to cut out squares on land cards from Magic the Gathering – so not even as complicated as a curved shape). But all the tutorials just show how to cut the outline to remove an image from the paper. But I want to remove the insides. Not sure how the outline and cutting line features of this work….
In my tutorial it shows you how you can either trace the entire object or just trace the outside of the object. If you trace the entire object, it will also trace any areas inside of the outline. If you do not want to cut the outline, you can grab just the outline and delete it. Hopefully that makes sense. If not, just let me know and I’ll see if I can find a better way to explain it:)
I was hoping it would work like that and I could just deselect all of the trace lines I didn’t want – but hope it will grab the inside boxes I want cut out. If I’m VERY lucky, it’ll also actually cut out creatures on the cards that I want to use as well…but we’ll see. I’m installing it tonight and giving it a shot. If it works, I’ll be able to make abacaus life counters out of magic cards in about 1/25th of the time it takes me to cut them by hand!
love your easy to follow tutorial. I also am having trouble getting my pixscan mat to register. I know it is probably a very simple step I am missing , Hope you do more on this issue. Thanks
Let me play around with mine again and I will see what the problem might be.
Your tutorial was very helpful! I almost gave up on trying to figure out the pixscan until I stumbled on this page. I’m still having trouble trying to change the border size and when I cut, it doesn’t cut clean (like it tears some of the sides when I’m removing the cuts from the negative space. Thanks for your help!
I’m so glad you found it helpful! As far as the problems with cutting, it might just take some experimentation with the blade depth and pressure. I’ve found that some materials cut great with Silhouette’s cut settings and some have to be tweaked a bit.
Why do I not get the option for a pix scan mat in my cutting mat options?
Hi Jessica,
Is your version of the design studio software a current one?
Hi,
Mine does not give pixscan as an option for cutting mat either and I definitely have the latest version of the software. Any other idea why it might not be there?
Hi Tanya,
On my toolbar at the top of my Silhouette Design Studio, the icon for pixscan is the 3rd icon from the left.
Hi, does anyone have an answer for this? I have the same issue. I have my image in the PixScan Design view and it is ready to cut. In my Design Page Settings, the Cutting Mat selections do not include the PixScan Mat. If I try to send the image to be cut without setting the mat, I get a registration error on the machine display.
Hi Peter,
Have you tried contacting Silhouette? They should be able to answer your questions for you.
Me too, did you get an answer for this?
Hi, I have been trying to get the pixscan to work for me and no one else seems to be having the same problem but I can’t figure it out. I upload the image of the thing i’m cutting on the pixscan mat but when it’s done uploading it just gives me a blank pixscan mat in my design view without my image on it. Do you know what the problem might be or how to fix it?
Dana, I’m so sorry you’re having problems. I’m not really sure why that would be. The only thing I can think of is to contact Silhouette and ask them for assistance.
Thanks so much for the tutorial. Did you have to calibrate anything first before using the pixscan?
No. There are registration marks on the mat that show the Silhouette the cutting margins. No calibration needed:)
I was wondering if you’ve ever had problems with the pixscan cutting off to one side more than the other when you have the image squarely centered in the offset? The first few times I used the pixscan it worked great, but now it cuts over to one side more than the other no matter what I do… Frustrating! Any ideas? Thanks!
I’m not sure. Is the paper moving slightly while it is cutting? Maybe the mat isn’t sticky enough anymore?
No, my mat is super sticky and the paper doesn’t move at all… It’s a bummer because it’s unusable at this point if it doesn’t cut where it should. I’ve contacted Silhouette, but they haven’t responded other than to say to calibrate my phone–which I did before I contacted them. 🙁
I’m so sorry they aren’t being helpful. I wish I could figure out what the problem might be.
Can you use the pixscan for vinyl?
I’ve never tried it, but as long as your vinyl has a design on it that can be photographed, I can’t see why not.