 Hey everyone! Today I’m going to share with you my latest tutorial. First, let me start by saying that I am so fortunate to be able to have the opportunity to work with Royal Design Studio Stencils and share my thoughts on their beautiful and fun stencils!
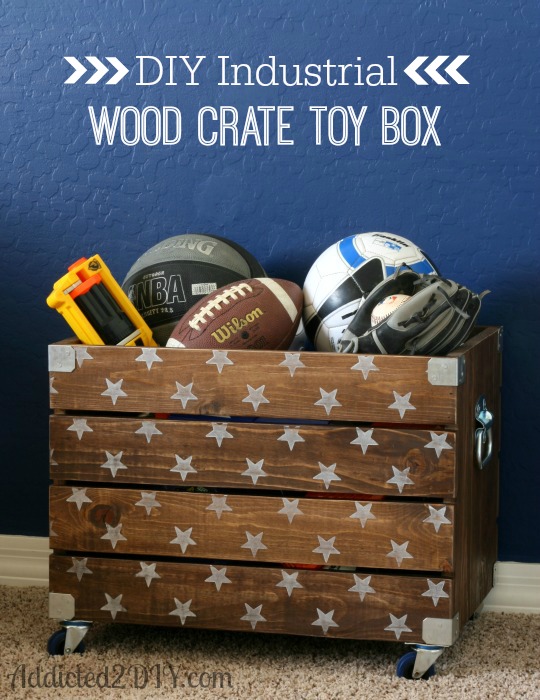
My oldest son had been needing a new toy box for a while and when I saw the Polka Star Stencil on the Royal Design website, I knew exactly what I would make! He’s really into sports and his room takes after that. I thought it would be perfect to make him a toy box with an industrial look but also tie it in with the sports look he wanted in his room. When I told him my idea, he was excited about the new toy box, but said “what do stars have to do with a sports room?” I tried to explain how stars work in an all-star room. He still didn’t get it, so I took a leap of faith and hoped that he’d like it when it was all done.
The crate itself was really easy to make. I bought 1 – 1″x8″x6′ board, 4 – 1″x4″x6′ boards, 4 – 2″ casters, 8 corner straps, and 2 – 3 1/2″ storage chest handles.
Cut list:
4 – 1×8 @ 15″ long (end pieces)
8 – 1×4 @ 22″ long (side pieces)
4 – 1×4 @ 20 1/2″ long (bottom pieces)
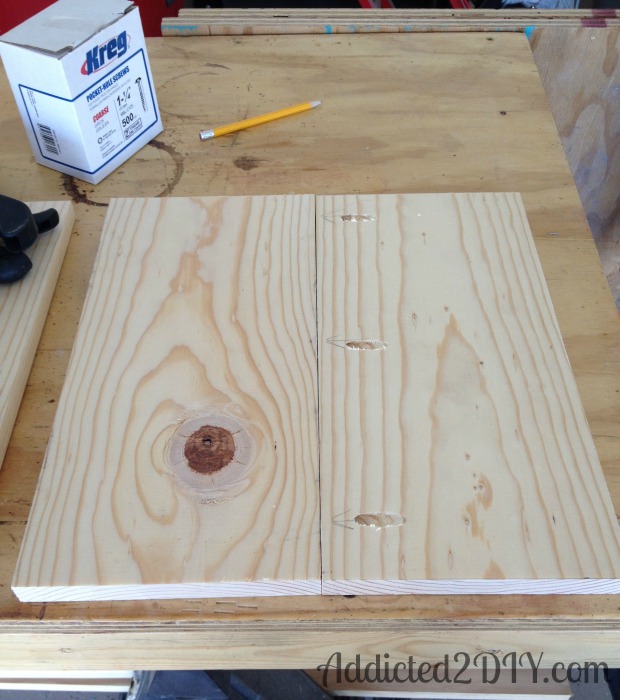
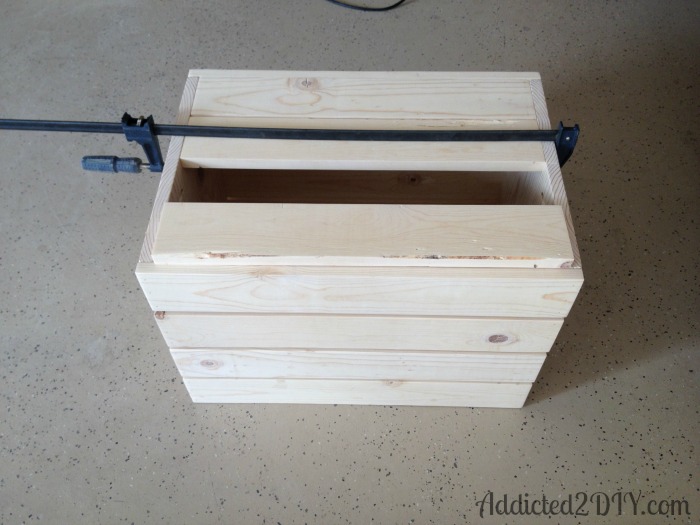
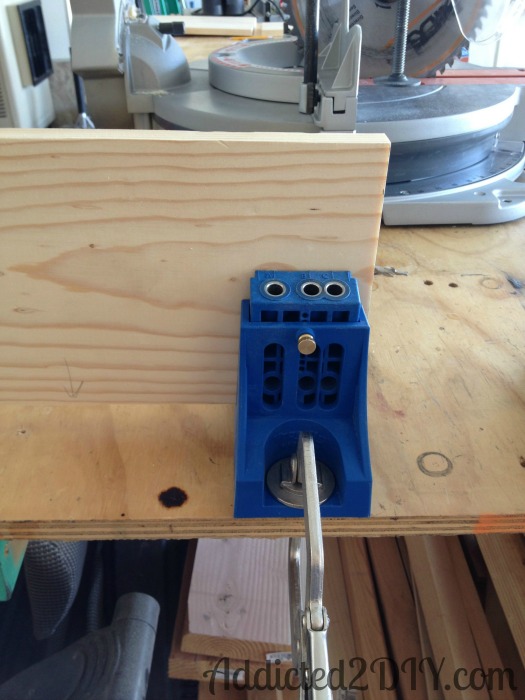 I started by making the sides of the crate. I used my Kreg Jig
![]() (affiliate link) to join together the 1×8 boards to make them 14 1/2″ wide.
(affiliate link) to join together the 1×8 boards to make them 14 1/2″ wide.
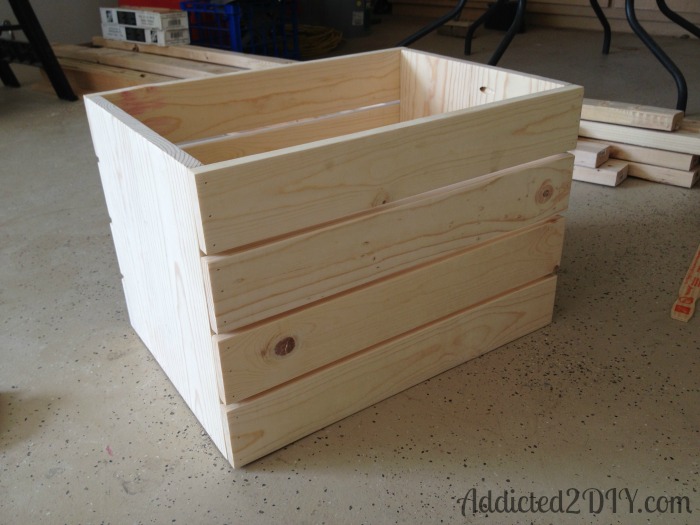
I sanded all of my pieces of wood and started assembling the pieces.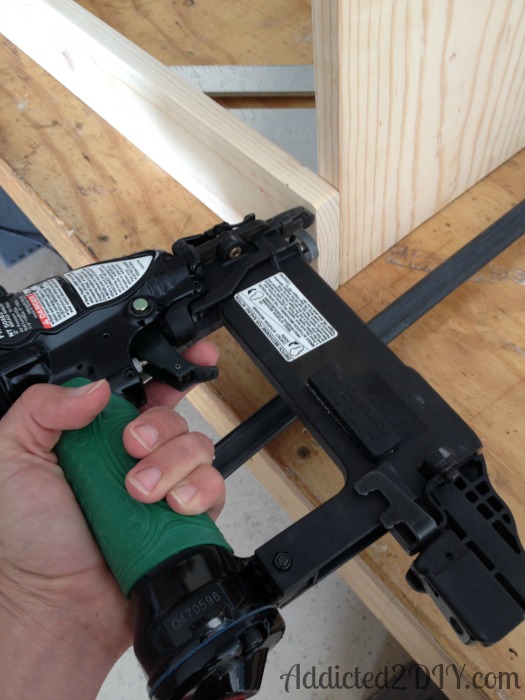
I spaced the side pieces approx 3/8″ apart and used 1 1/4″ brad nails and wood glue to attach them to the ends.
 I nailed the bottom pieces the same way, spacing them approx 1/8″ apart.
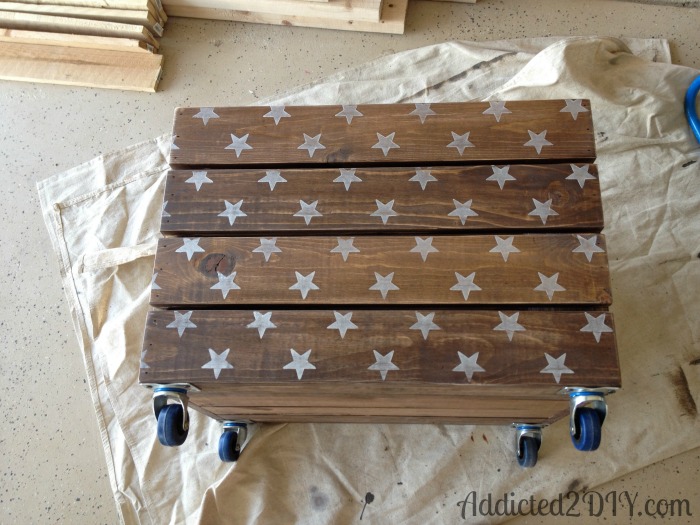
 I finished the crate with Minwax Stain in Special Walnut.
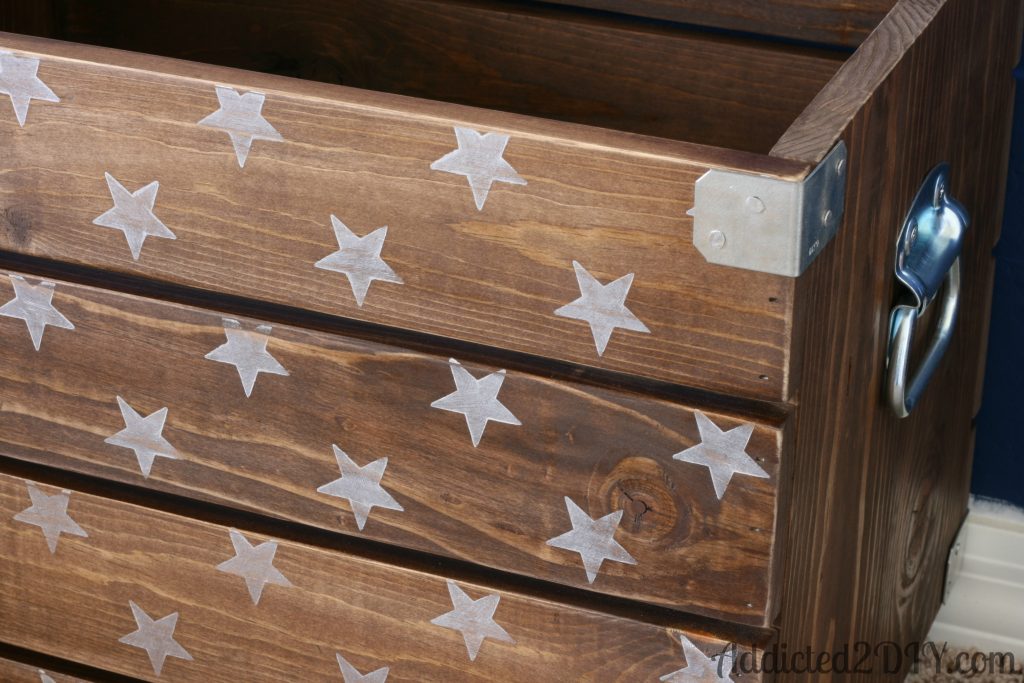
 Once the stain was dry, I attached the casters and stenciled the stars. This stencil was really easy to use. I wanted the stars to be white, so I chose the Royal Design Pearl Oyster Stencil Creme. For some reason, it didn’t click in my head that it would also have a pearl finish to it, but it actually worked well with this project.
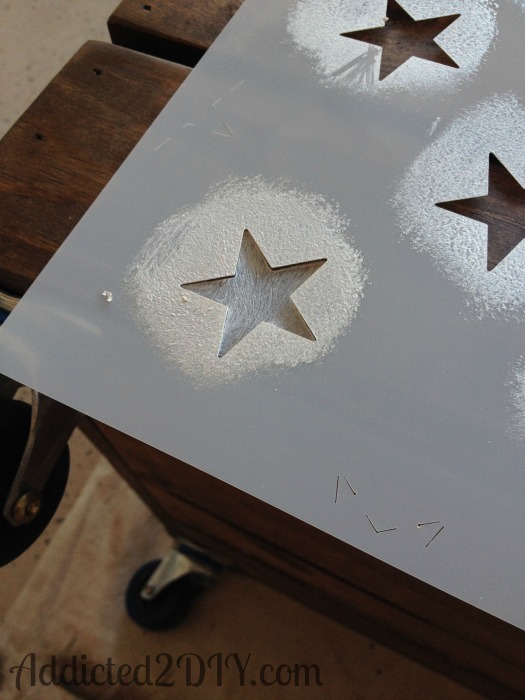 To stencil the design, I used a 1 1/2″ stencil brush and lightly dipped it into the stencil cream. I dabbed it into a paper towel to remove any excess cream and then in a small swirling motion applied the paint to the crate. You can see that the stencil did not cover the entire crate, so when I was done stenciling all of the stars, I lined the stencil up again and finished off the crate. Once it was dry, I flipped the crate over and stenciled the other side. It was easy enough that my son was able to help!
 Remember when I said my son didn’t get it when I told him I was putting stars on his toy box? He thought it looked pretty awesome when we were done stenciling:)

I sanded the entire crate to distress it a bit and then added the corner straps. I wanted to use nails and found these 1/2″ cut tacks at Lowes. They look great, but they are aluminum, which meant I had a bunch that bent at the tip because the metal is so soft.
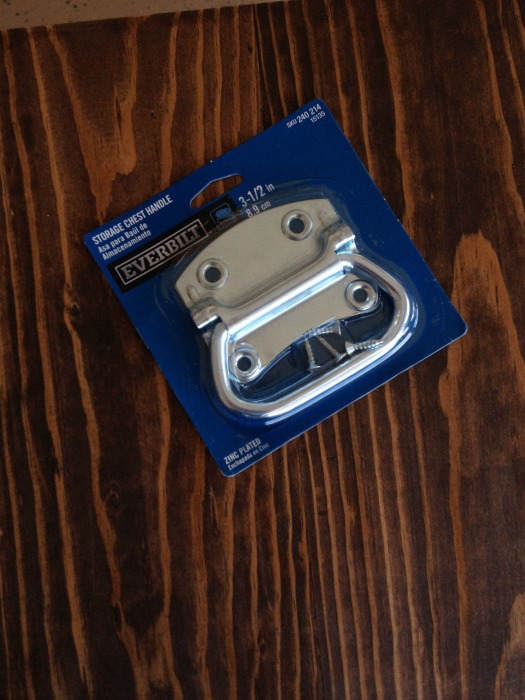 I attached the handles and the crate was done!
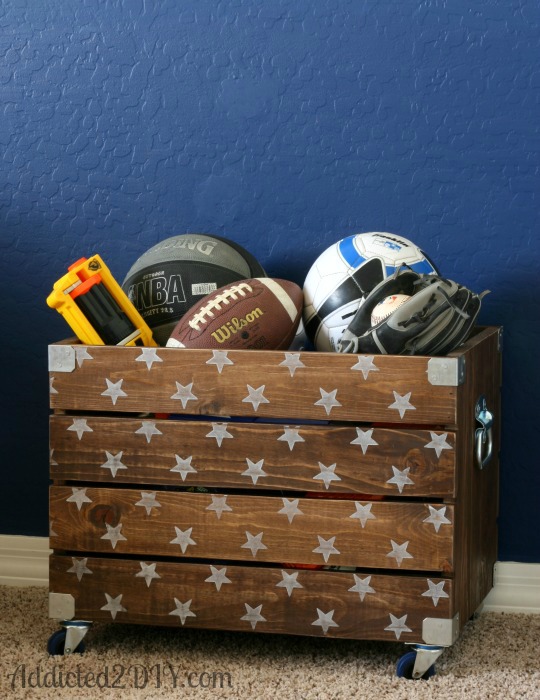 I love how the crate turned out and so does my son. He was so excited to be able to put all of his sports balls in it. I’ve got a lot more plans for his room and I can’t wait to get started on some new projects. I also loved these stencils and I’ve got some other fun plans for this stencil design. I’ll even let you in on a little secret. Tomorrow, I’m hosting a giveaway where you could win a stencil design of your choice!
~Katie
Royal Design Stencils sent me these products to review; however, the opinions I’ve shared of these products are entirely my own.
Linking up over at these parties:
Elizabeth Joan Designs, Just a Girl and Her Blog, The NY Melrose Family, SohoSonnet, The Pin Junkie, Remodelaholic, Tatertots and Jello, View from the Fridge
I love this crate! Super cute! Love the stars!
We would love to you to come and link up with us at Your Designs This Time.
http://elizabethjoandesigns.com/2014/03/designs-time-no-3/
Emily @ elizabethjoandesigns.com
Emily recently posted…Easy DIY Easter Basket
Thank you Emily! I will stop by and link up!
Thanks for sharing with us at Your Designs This Time!
Emily & Erin @ elizabethjoandesigns.com
Emily recently posted…Spring Moss Wreath
Thank you for inviting me to your linkup!
This project is being featured today at Your Designs This Time!
Emily & Erin @ elizabethjoandesigns.com
Emily recently posted…Your Designs This Time – No. 4
The shimmer of the pearl paint looks so good with the metal corner accents & handles. Great job!
Melissa @ A Prudent Life recently posted…April Goals
Thanks Melissa!
super super cute!!!!! Christine from Little Brags
Christine recently posted…Hiding A Thermomstat In Plain Sight
Thank you Christine!
So cute! Nice job.
Lindsay Eidahl recently posted…Grain Sack Striped Table
Thank you!
WOW!! you did a ton of work!! This turned out Amazing, love love love
Sonnet @ SohoSonnet Creative Living recently posted…SohoSonnet Partnership with Mint Bridal!
Thank you! I wasn’t sure how it would all turn out, but I do love the results!
I love all of the details of this project! This would go great in my son’s bedroom.
Thank you for the inspiration!
Lindsey recently posted…DIY “Dipped” Baskets
Thank you Lindsey! Have a great week!
I really love the star stencil painted on this. So smart-looking. My husband is the handy one, so I’m going to share this plan with him 🙂 Found you over at Whimsy Wednesday!
Jill recently posted…Green Apple Cookie Butter Oatmeal Smoothie
Thank you, Jill! The stars are definitely my favorite part!
Awww that’s so adorable! I love the stencil too. Great job!
Amanda Michelle recently posted…Organizing for a Garage Sale {With a Free Printable!}
Thanks Amanda:) This stencil was so fun!
Hi Katie! This crate is adorable! I love the stars and the pearl finish looks great with the stain too. Thanks so much for sharing 🙂
Meg @ Lip Gloss and Lumber recently posted…How to paint wooden dowels, the SUPER EASY way!
Thank you Meg!
This turned out so so cute!! Thank you for sharing at our link it or lump it party!
Amy @ Delineate Your Dwelling
Amy W recently posted…Gold Striped Eggs
Thanks Amy! Have a great week!
I cannot believe you made this! What an amazing job you did. See I need tutorials like this because I could NEVER make this on my own. I would be buying the pre-made ones at Michaels. I have to have one like this for my boys playroom. Thanks!
Courtney @ Crafts by Courtney recently posted…Easy DIY Easter Egg Crayons
Thank you Courtney! I am so glad you found the tutorial helpful. This one is so much bigger and stronger than the one at Michaels. Perfect for toys!
This box is fantastic!
Bette @ somerset lane recently posted…FEATURE FRIDAY: A Prudent Life
Thanks Bette!
This is great! Thanks for sharing! This would be super cute in my future office to hold my yarn! : )
~Sarah
http://atowngirlslife.blogspot.com/
Sarah recently posted…Free Printables…
Such a great idea, Sarah! Thanks for stopping by!
This is truly amazing Katie! I can’t believe you made it from scratch. I am featuring this tomorrow on Link It Or Lump It 🙂
Sonnet @ SohoSonnet Creative Living recently posted…20 Ideas to Decorate a Blank Wall
Thank you, Sonnet!
Good morning Katie! I love this toy box so much, I’m featuring it on my blog this morning! ~Lisa
Lisa @ Practically Perfect Home recently posted…Weekly Wonders #11
Thanks so much, Lisa! That’s a nice way to start my week!
Oh my gosh, this is amazing!!! Such a great tutorial! Thanks for sharing!!
-Tahnee @laneandalley.blogspot.com
Thank you Tahnee!
Hi Katie!! I just LOVE this bin. I was sure I commented before (because I know I’ve stopped by this post several time), but apparently not! Can. Not. Believe you made from scratch! Thanks so much for stopping over to link up at our new party Cook It! Craft It! Share It! Have a great weekend!!
Katie recently posted…10 Fabulous Furniture Makeovers {DIY Sunday Showcase Features}
Thanks Katie! I love it too. I may end up making him a second one to tackle his Lego collection:)
Thank you so much for sharing the plans to the toy box. I have five boys who have large tractors and toys that I couldn’t figure out what to do with. This box is perfect and the boys love it. Made ours a little bigger.
Awesome! Yes, it’s definitely a great toy box for boys.
I love this project I’m working on something similar using cedar. Found on Pinterest.
Carole West @ Garden Up Green recently posted…Beginner Gardeners – When to Water
Thank you! I’m sure your cedar version will look amazing!
That toy box crate is so cool looking. It is as if the crate toy box is a timeless classic, as far as designs go. What is the best wood to use for such a crate?
Thank you:). I used pine boards for it.
Lovely DIY Projectl! Have a nice weekend!
Really nice idea there Emily, so nobody will have to ask where they dropped the ball or their tennis racket anymore. It’s a very good storage which I am really thinking of making one for sports equipment. Although I am not the best in woodwork I think this is something that is doable and I should give it a shot, Thanks for sharing.
Cindy